Country toilets are simple designs, the main purpose of which is easy for the average person to understand without a word. However, in the pursuit of improving the landscape picture, summer residents refuse classics of the genre. Ordinary frame birdhouses with enviable speed are replaced by structures in the form of a hut. They look more interesting, agree?
For lovers of country life, we offer the best drawings of a country toilet like a hut. We present for review several modifications, each of which is distinguished by originality, convenience and reasonableness of the solution. To help the skilled owners, the article provides instructions for assembling and installing important household objects.
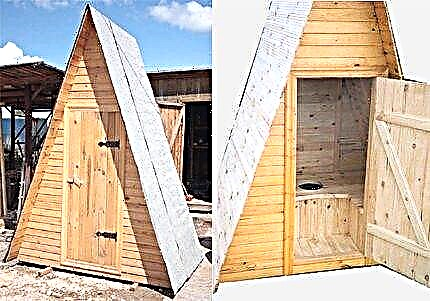
Toilet device in the form of a hut
The design of the hut is primarily attractive in a simple and original form. Buildings in this design are usually used for the construction of utility cellars. Now here is the fashion for "huts" came close to the country toilets.
Projects of triangular prisms with a gable roof are quickly gaining popularity in the community of homeowners.
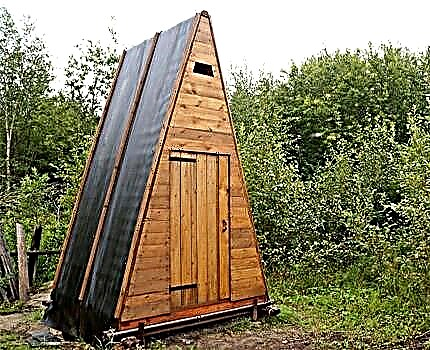
To replace classic rectangular toilets, summer residents increasingly prefer to put simple, but quite original designs of a triangular and trapezoidal shape. The so-called toilets are installed and successfully serve the owners of many hacienda.
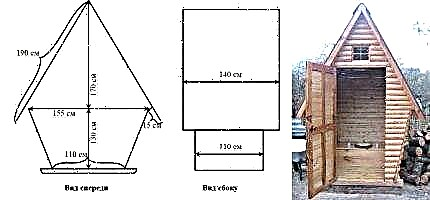
One of the options, represented by a standard drawing of a country toilet of a series of huts, rises 2.5-3 meters in height and covers an area of 1.2 (2.00) x 1.0 (1.5 m) on the base.
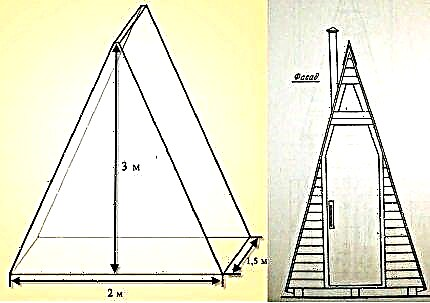
These dimensions are quite enough for a person of average height and the same average build for a comfortable stay indoors dacha toilet. Therefore, the owners of modern private households prefer to build a toilet hut according to such a drawing
Large financial costs are not expected here. Physical activity during the construction process is also small.
Of the materials usually required:
- wooden beam (50 x 50 mm);
- wooden beam (150 x 150 mm);
- grooved flooring board (140 x 20 mm);
- board for crate and cladding (100 x 12 mm);
- roofing material;
- varnish, paint, fasteners.
It is not at all necessary to be limited only to the use of these materials. Given the variety of products on the construction market, as well as using the simplest drawings of a country toilet for a typical hut, there are great opportunities in terms of construction and design.
So, instead of the usual boards with no less success, sheet plywood is suitable. The rack type crate will successfully replace a continuous flooring. And instead of roofing material, bitumen shingles will lie beautifully on the crate. In general, there is room for extraordinary ideas.
The builder’s hands, attached with pleasure, create such hut structures that technically also play the role of toilets
Structures of this type are becoming traditional. Their drawings are distributed everywhere and put into practice.
Image Gallery
Photo from
Simple and economical construction
Gable type construction
Rafter system
Fairytale house as a development of a hut theme
How to build a country toilet hut?
Work is carried out with the help of a tool, often used in summer cottages.
To implement the idea from the drawing into a real country toilet hut, the builder, in particular, needs:
- hacksaw or electric jigsaw;
- planer, chisel, hammer, hatchet;
- building meter, a simple pencil.
Even before the start of construction, it is recommended to determine the place of installation of the "need" in the personal territory. Usually choose the part of the summer cottage area, where there are no plantations, water sources, buildings for eating nearby.
It is reasonable to build a country hut toilet on a high-rise site, no closer than 10-12 meters from residential buildings. Convenient construction approaches should be provided in case of cesspooling.
Construction is possible on the basis of a dry closet or as a project with a cesspool (septic tank). Consider both options.
House for installation of a dry closet
For a summer house, the best choice is a dry closet. This construction option will not only allow equipping the summer residents with a much-needed building, but it will also provide amateurs to grow vegetables and fruits with good quality fertilizers. The dry closet does not require significant physical strength.
When arranging a country toilet such as a hut, land owners often choose drawings of dry closets for themselves. This option is considered as the most rational for personal plots.
The dry closet is characterized by increased functionality - it opens the way to the production of fertilizers.
Frame Assembly Instructions
If possible, it is recommended to use planed lumber for the construction of the structure of the hut and directly the details of the country dry closet.
In extreme cases, if the boards and bars have a rough surface, you need to treat them with a planer. In practice, it was noticed that planed lumber is much less likely to be attacked by various kinds of insects.
The sequence of steps the builder:
- Along the perimeter of the base (1.2 x 1.0 m), make a small (100-150 mm) deepening into the ground.
- Cover the bottom of the deepening with crushed stone (filling height 50-70 mm), compact well.
- Cover the tamped surface with roofing material (waterproofing).
- Pour a layer of sand (20-30 mm), evenly distribute on the surface.
- Put a second layer of roofing material with some margin along the perimeter.
- At the borders of the perimeter, lay a timber (150 x 150 mm) over the roofing material.
After completing these works, the foundation is ready for the construction of the hut of the country toilet according to the drawing. Next, you need to assemble the floor of the toilet from the tongue-and-groove boards and fasten it along the edges with the bars located around the perimeter. This can be done, for example, using metal corners cut to size.
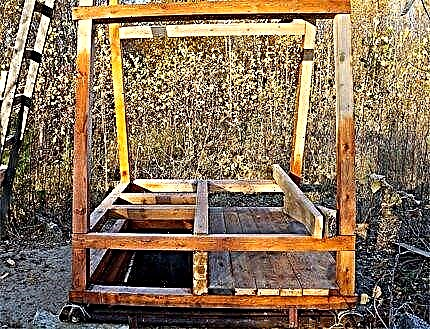
The construction of a hut toilet usually begins with the construction of a common frame and the assembly of the floor. Of course, a different sequence of work is not excluded.
The main task is to build a reliable solid structure, especially when a permanent construction is being built.
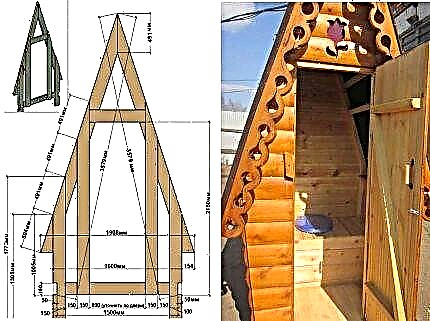
The next step is to begin assembling the frame of the hut of the country toilet, as indicated in the drawing. Take two bars 50 x 50 mm, set them vertically and perpendicular to the base. The lower ends of the small bars are fixed to the bars of the base, and their upper ends are combined with slices one with the other and also fastened.
Thus, several rafter elements are formed every 200 mm. The ridge part is additionally strengthened by the insertion of a beam skipped from below. They also put reinforcing bridges between the rafters in different places both on the short side and on the long one. The frame of the future country "need" is ready.
Housing and trim
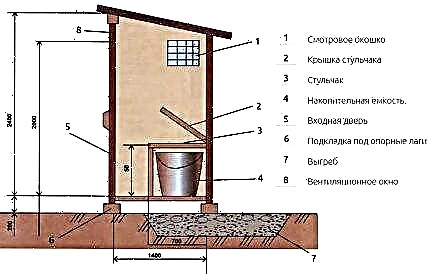
Having completed the assembly of the hut frame, proceed to the assembly of the base of the dry closet. At a level of 350-400 mm from the floor, a jumper is attached between the two rear rafters of the hut. Having indented from it by 400-450 mm to the front part, a second jumper is attached at the same level.
Below the second jumper, a third jumper is placed at floor level. These will be the base beams of the dry closet, on which the lining will lie. Further, the upper jumpers are reinforced by struts, stops and sheathe all voids with boards, cutting them to size. They make sections for the toilet bowl and under the peat storage.
Equip them with covers (for the toilet section + seat with a hole). Roofing material is laid on the pitched roof of the hut. Make the door in the plane of the front wall. On this assembly can be considered completed.
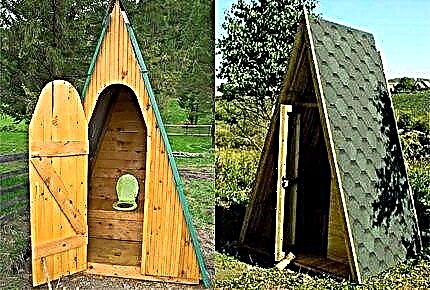
Variants of the device doors country toilet type hut. View from the outside as well as from the inside. The technology for assembling canvases is simple - a set of tongue-and-groove boards fastened with a battens of the “Z” type. Door hinges usually put overhead
This, approximately, seems to be the simplest design of a toilet for a summer residence, made by the type of a hut. It is small, somewhat uncomfortable due to the limited space inside. But at the same time, it occupies a small part of the territory of a summer cottage area, where each square meter is usually registered.
For better stability and reliability of the structure at the corners of the base of the timber (150 x 150), close to it, they drive metal pipes into the ground and attach the supporting part of the building to them. Under the slopes of the roof, gutters are arranged to collect and drain water. It is also advisable to put the blind area along the outer perimeter.
Simple design with cesspool
According to the same principle, a hut for a country toilet with a cesspool is built, but this design has its own nuances. The first caveat is the construction of a cesspool. The second nuance is that the drive must be sealed (SanPiN standards). The drawing in this case is also different, because in addition to the hut project, it also contains the pit project.
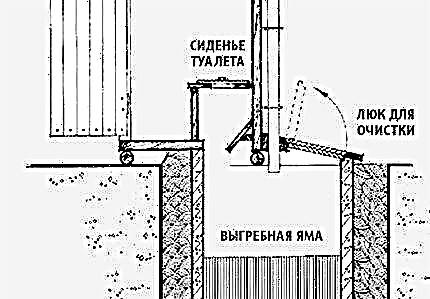
A common drawing of the classical scheme of a country hut toilet, supplemented by a cesspool. The design is not very popular among summer residents, since its operation is associated with the problem of pumping and removal of feces
First of all, dig a hole under the tank. For a summer cottage, a volume of 2-3 m is quite enough3 (maximum 5 m3) The size of the width of the pit, as a rule, is equal to the size of the width of the structure of the hut. The bottom is done with some bias back from the toilet.
The walls and bottom of the pit are waterproofed, laid out with brick and plaster or poured concrete formwork around the perimeter. This ensures the tightness of the drive, which is important in most cases, the construction of such facilities.
Along with hermetic schemes, the construction of cesspools with drainage functions into the open ground is also practiced. Building cesspools according to such drawings is permissible, but only in places with a low occurrence of groundwater.
A simple example of making a cesspool for a country toilet with a drainage function. Such solutions make it possible to less often engage in pumping out feces. But this scheme of drains can become dangerous for the summer residents themselves
However, the best option is still a sealed system, so we will further consider the construction of a directly isolated option.
The back part (approximately 2/3) of the upper area of the drive is covered with a slab (metal, wood or concrete). The stove is equipped with a hatch through which feces are pumped out. The hatch, according to the standard drawing, is located at the rear wall of the building.
The rest of the upper area will be covered by the design of the hut toilet, which will be located above the cesspool. With this construction option, the toilet floor is laid and attached to the formwork, like the main structure.
Image Gallery
Photo from
Excavating pit pit
Cesspool without pumping
Concreting pit overlap with pumping
Plate above the pit with a pumping hole
The construction of the frame and floor takes several hours. But you have to tinker with the cesspool.
If the shield with the hatch is made of metal, it is necessary to provide protection against corrosion. For this, metal surfaces are coated with paint, other protective coatings are used. A wooden product needs to be treated with an antiseptic, impregnated with varnish, painted. In fact, the methodology for protecting a building structure must be applied to the entire structure as a whole.
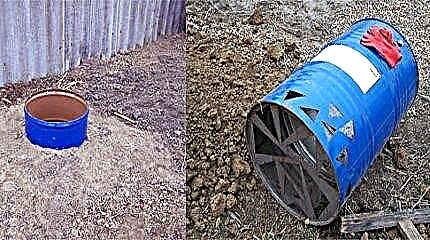
The budget version of the composting pit can be built from old tires:
Image Gallery
Photo from
Step 1: Pit Construction from Old Tires
Step 2: Construction of the grillage on a column foundation
Step 3: Impregnating grillage and related parts
Step 4: Construction of a toilet toilet toilet seat
Much more expensive, more complicated, but certainly more reliable and safer from an environmental point of view, a storage tank is made from a factory-made plastic tank:
Image Gallery
Photo from
To develop a pit for installing a plastic drive, a place is chosen that is convenient and accessible for the access of the scavengers, but not less than 5 m from the house
In size, taking into account a distance of 0.5 m from the plastic container around the perimeter, they dig a pit. Depth it should be 0.2-0.3 m more
The bottom of the pit is sprinkled with a layer of sand 25-35 cm high, rammed and leveled to the horizon
A sewer pipe is taken out of the toilet house or summer house, as toilets are not placed directly above the plastic drive
If the length of the sewer pipeline is more than 15 m or its route has turns, inspection and swivel wells are installed to monitor the system and perform cleaning
Sewer pipe in the trench is laid with a slope towards the plastic drive installed in the pit
A foundation pit with a plastic tank is covered with a sand concrete mixture, which, when soaking in ground water, turns into an artificial stone and does not allow the tank to “float” during the flood period
Over the storage tank, a concrete slab is poured into the formwork with a hole that must be left for pumping
Stage 1: Breakdown of the excavation site
Stage 2: Forming a foundation pit for a plastic container
Stage 3: sanding the bottom and tamping
Stage 4: Discharge of the sewer pipe from the toilet
Stage 5: Sewer Manhole
Step 6: Connect the sewer pipe to the storage tank
Stage 7: Backfilling of the pit with sand concrete mixture
Stage 8: Concrete Floor Slab
Shelter type toilet drawings
Summer residents practice the construction of toilets, to some extent, reminiscent of the construction of a hut. These are the so-called "chicken huts" or "birdhouses."
Projects are copies of the mentioned buildings, covered with a pitched roof. The characteristic features of the drawings of "birdhouses" are steep high slopes of the roof and low walls
The advantageous side of such a building is that with the same dimensions as the “hut”, you can get more free space inside.
Externally, the structure looks no less attractive than a triangular prism. Often the walls of such country toilets are built from logs of small diameter - a frame is made
It turns out a beautiful building that fits well into the natural landscape of a summer cottage.
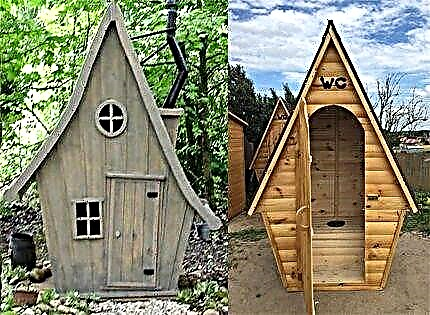
Related projects for a hut toilet. Also quite original structures from the series “hut on chicken legs” and “birdhouse”. Due to the addition of a triangular prism with a base in the form of a truncated parallelepiped, the useful internal area increases
Drawings of such country toilets have slight differences from drawings of toilets such as huts. Therefore, the technology of the device of the bathrooms is almost identical to the options described above.
It will only be necessary to slightly increase the material base and complement the set of construction tools. Often, projects of such buildings contain windows and vents, natural or forced ventilation.
An interesting and practical solution for arranging a summer cottage is a structure that includes a toilet with a shower. The rules of design and implementation of the project will be introduced by our recommended article.
An educational video about the important nuances of the construction process.
The presence of such a building as a toilet at the summer cottage makes the life of hacienda owners more comfortable. If you approach the construction of the structure, taking into account all the nuances of its use in the country, you can build a structure that is doubly useful.
Carefully thought out and drawn up drawings will help to make the "need" of the original design. In the end, the country landscape is also a goal for the gardener's fantasies.
Tell us about how the toilet was built at your summer cottage, which option and which scheme was used in the construction. Leave posts and photos with the construction process in the block below. Ask questions, share information that will be useful to site visitors.